Build and Deployment
Preface
Since this is a demonstration project, the package size after building is relatively large. If there are plugins in the project that are not used, you can delete the corresponding files or routes. If they are not referenced, they will not be packaged.
Building
After the project development is completed, execute the following command to build:
Note: Please execute the following command in the project root directory.
pnpm buildAfter the build is successful, a dist folder for the corresponding application will be generated in the root directory, which contains the built and packaged files, for example: apps/web-antd/dist/
Preview
Before publishing, you can preview it locally in several ways, here are two:
- Using the project's custom command for preview (recommended)
Note: Please execute the following command in the project root directory.
pnpm previewAfter waiting for the build to succeed, visit http://localhost:4173 to view the effect.
- Local server preview
You can globally install a serve service on your computer, such as live-server,
npm i -g live-serverThen execute the live-server command in the dist directory to view the effect locally.
cd apps/web-antd/dist
# Local preview, default port 8080
live-server
# Specify port
live-server --port 9000
Compression
Enable gzip Compression
To enable during the build process, change the .env.production configuration:
VITE_COMPRESS=gzipEnable brotli Compression
To enable during the build process, change the .env.production configuration:
VITE_COMPRESS=brotliEnable Both gzip and brotli Compression
To enable during the build process, change the .env.production configuration:
VITE_COMPRESS=gzip,brotliNote
Both gzip and brotli require specific modules to be installed for use.
gzip 与 brotli 在 nginx 内的配置
http {
  # Enable gzip
  gzip on;
  # Enable gzip_static
  # After enabling gzip_static, there might be errors, requiring the installation of specific modules. The installation method can be researched independently.
  # Only with this enabled, the .gz files packaged by vue files will be effective; otherwise, there is no need to enable gzip for packaging.
  gzip_static on;
  gzip_proxied any;
  gzip_min_length 1k;
  gzip_buffers 4 16k;
  # If nginx uses multiple layers of proxy, this must be set to enable gzip.
  gzip_http_version 1.0;
  gzip_comp_level 2;
  gzip_types text/plain application/javascript application/x-javascript text/css application/xml text/javascript application/x-httpd-php image/jpeg image/gif image/png;
  gzip_vary off;
  gzip_disable "MSIE [1-6]\.";

  # Enable brotli compression
  # Requires the installation of the corresponding nginx module, which can be researched independently.
  # Can coexist with gzip without conflict.
  brotli on;
  brotli_comp_level 6;
  brotli_buffers 16 8k;
  brotli_min_length 20;
  brotli_types text/plain text/css application/json application/x-javascript text/xml application/xml application/xml+rss text/javascript application/javascript image/svg+xml;
}
Build Analysis
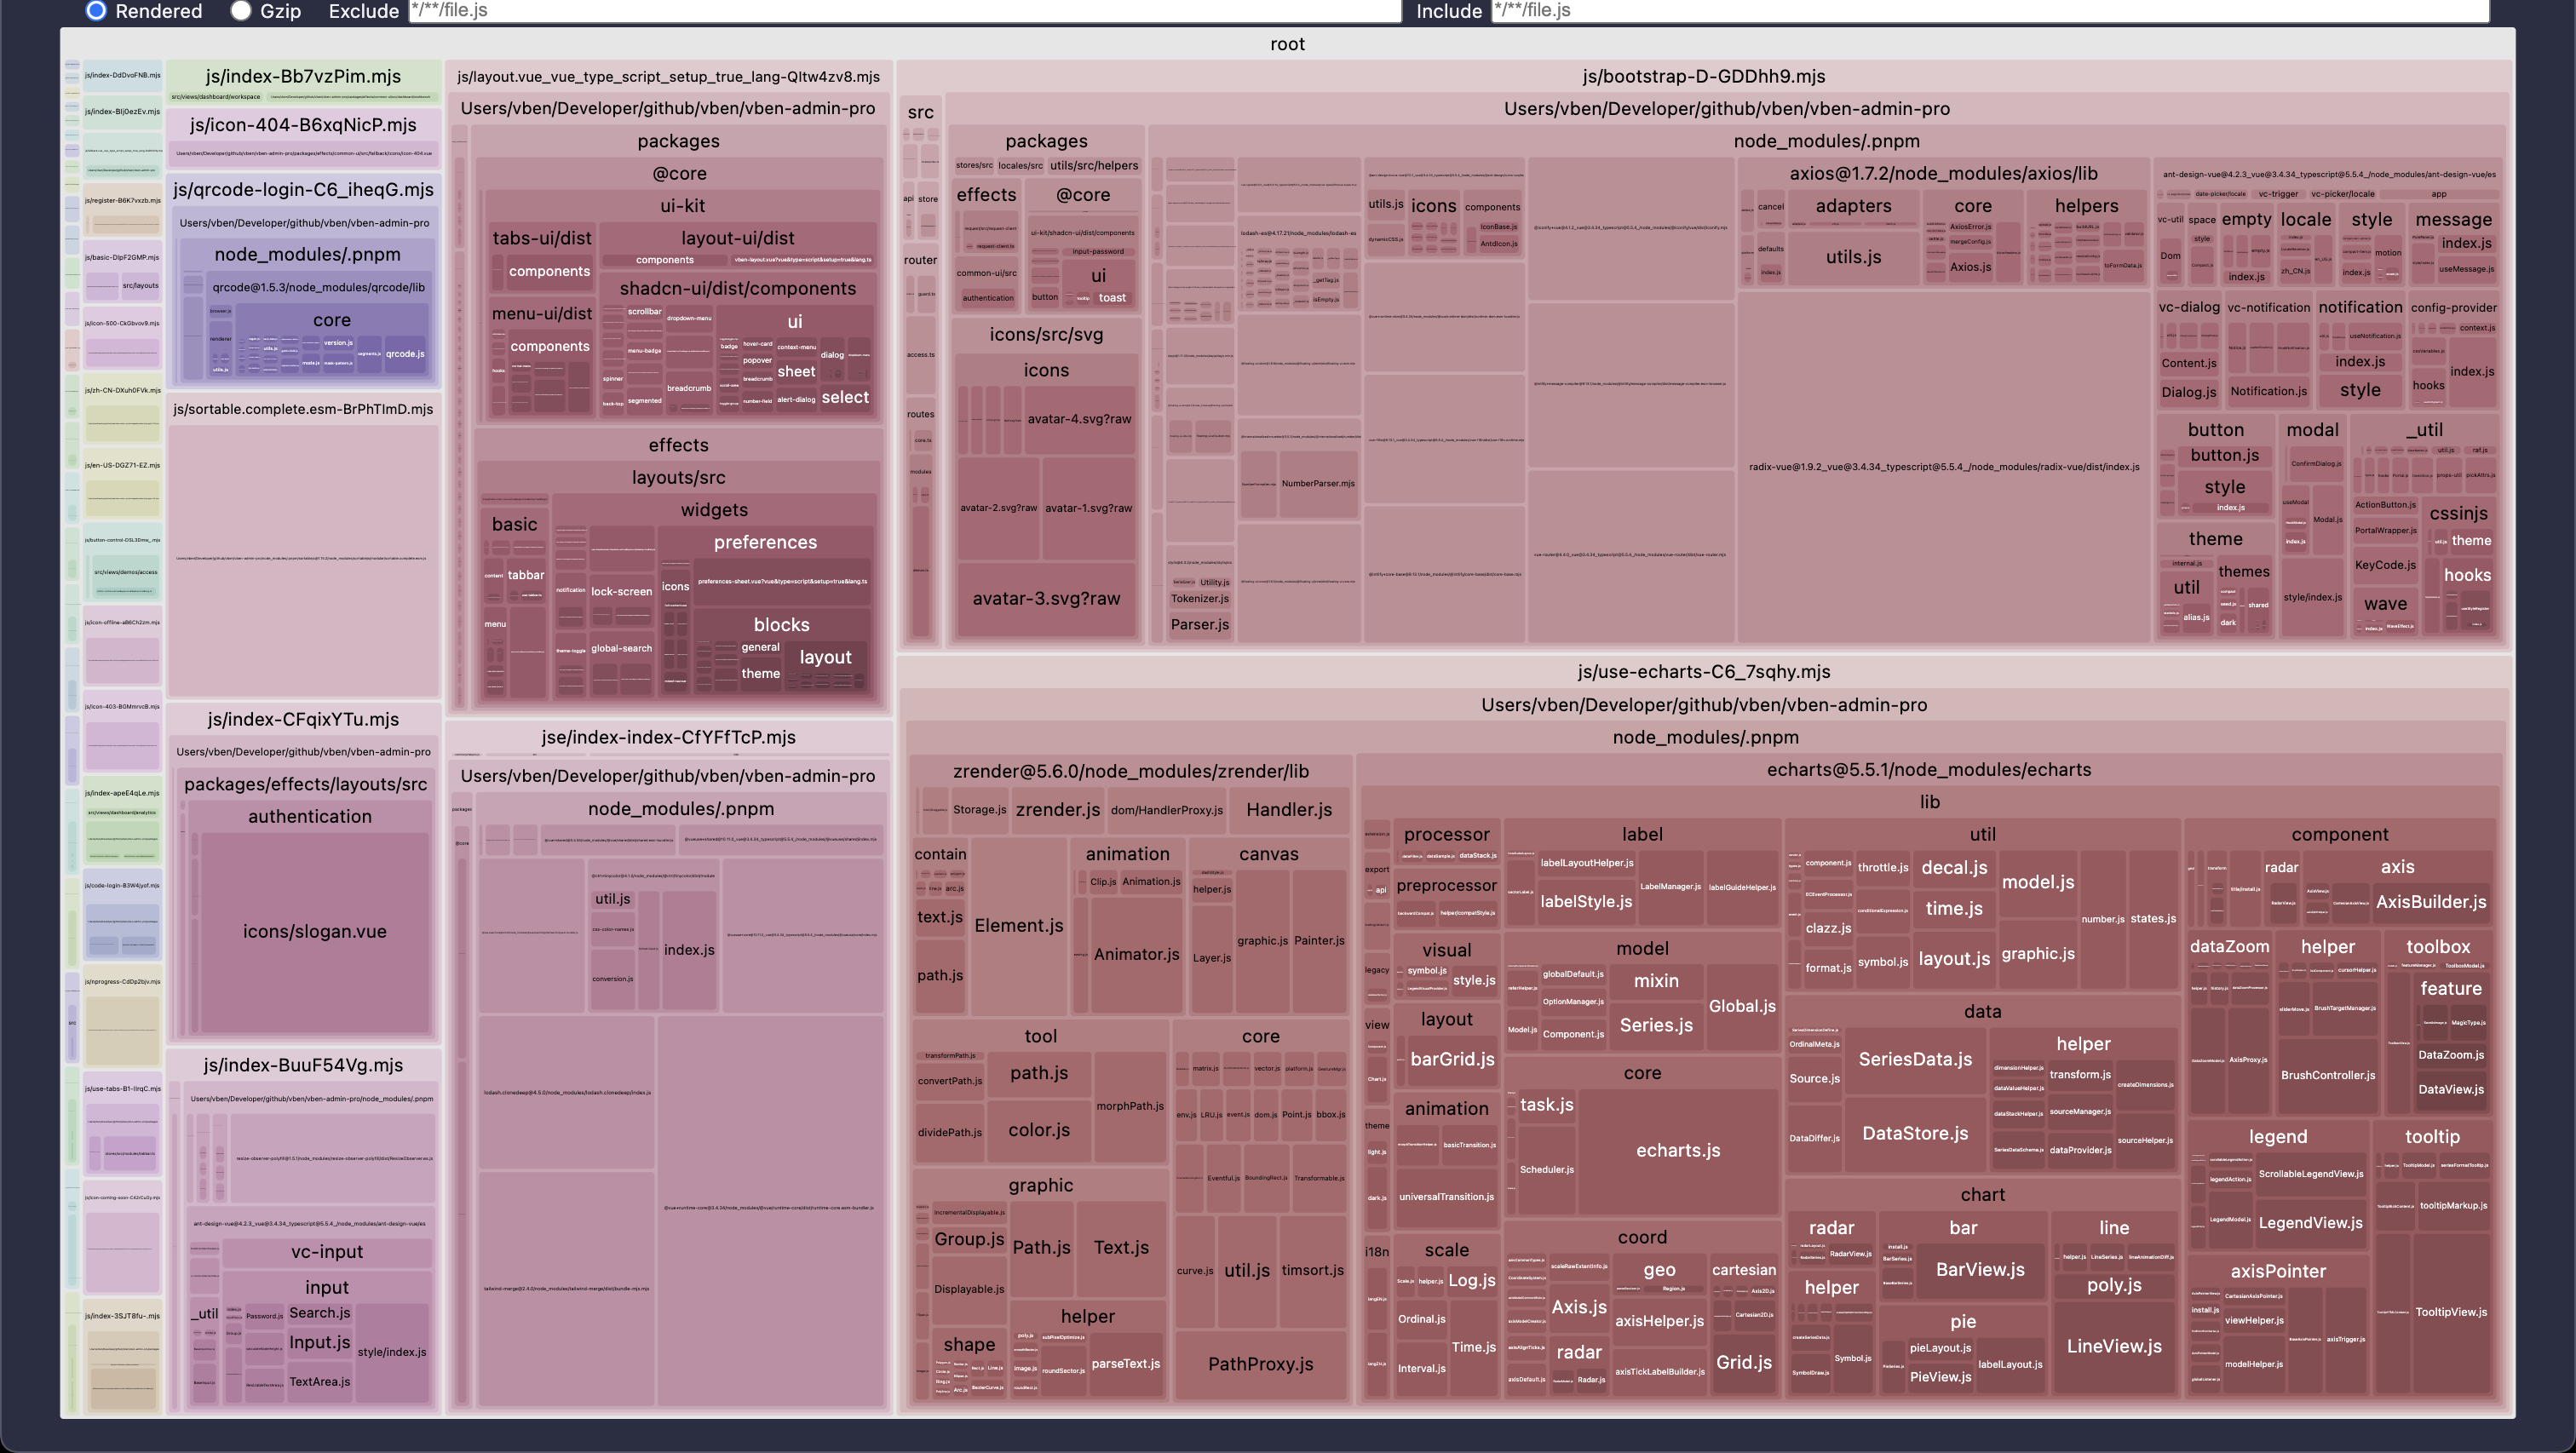
If your build files are large, you can optimize your code by analyzing the code size with the built-in rollup-plugin-analyzer plugin. Just execute the following command in the root directory:
pnpm run build:analyzeAfter running, you can see the specific distribution of sizes on the automatically opened page to analyze which dependencies are problematic.
Deployment
A simple deployment only requires publishing the final static files, the static files in the dist folder, to your CDN or static server. It's important to note that the index.html is usually the entry page for your backend service. After determining the static js and css, you may need to change the page's import path.
For example, to upload to an nginx server, you can upload the files under the dist folder to the server's /srv/www/project/index.html directory, and then access the configured domain name.
# nginx configuration
location / {
  # Do not cache html to prevent cache from continuing to be effective after program updates
  if ($request_filename ~* .*\.(?:htm|html)$) {
    add_header Cache-Control "private, no-store, no-cache, must-revalidate, proxy-revalidate";
    access_log on;
  }
  # This is the storage path for the files inside the vue packaged dist folder
  root   /srv/www/project/;
  index  index.html index.htm;
}
If you find the resource path is incorrect during deployment, you just need to modify the .env.production file.
# Configure the change according to your own path
# Note that it needs to start and end with /
VITE_BASE=/
VITE_BASE=/xxx/
Integration of Frontend Routing and Server
The project uses vue-router for frontend routing, so you can choose between two modes: history and hash.
hashmode will append#to the URL by default.historymode will not, buthistorymode requires server-side support.
You can modify the mode in .env.production:
VITE_ROUTER_HISTORY=hashServer Configuration for History Mode Routing
Enabling history mode requires server configuration. For more details on server configuration, see history-mode
Here is an example of nginx configuration:
Deployment at the Root Directory
server {
  listen 80;
  location / {
    # For use with History mode
    try_files $uri $uri/ /index.html;
  }
}
Deployment to a Non-root Directory
- First, you need to change the
.env.productionconfiguration during packaging:
VITE_BASE = /sub/- Then configure in the nginx configuration file
server {
    listen       80;
    server_name  localhost;
    location /sub/ {
      # This is the path where the vue packaged dist files are stored
      alias   /srv/www/project/;
      index index.html index.htm;
      try_files $uri $uri/ /sub/index.html;
    }
}
Cross-Domain Handling
Using nginx to handle cross-domain issues after project deployment
- Configure the frontend project API address in the
.env.productionfile in the project directory:
VITE_GLOB_API_URL=/api- Configure nginx to forward requests to the backend
server {
  listen       8080;
  server_name  localhost;
  # API proxy for solving cross-domain issues
  location /api {
    proxy_set_header Host $host;
    proxy_set_header X-Real-IP $remote_addr;
    proxy_set_header X-Forwarded-For $proxy_add_x_forwarded_for;
    # Backend API address
    proxy_pass http://110.110.1.1:8080/api;
    rewrite "^/api/(.*)$" /$1 break;
    proxy_redirect default;
    add_header Access-Control-Allow-Origin *;
    add_header Access-Control-Allow-Headers X-Requested-With;
    add_header Access-Control-Allow-Methods GET,POST,OPTIONS;
  }
}
Contributors
 invalid w
 Li Kui